Saturday, August 24, 2013

Solution to the Twin Devils on Ubuntu Laptops : Heating up and Battery drain

                          Two major problems I have experienced with Ubuntu on a laptops are heating up and battery drainage. Most of the modern day devices have the capability to save power. The drivers installed on the Ubuntu has the capability to do that also. But they are underutilized. This results in the dual problems of heavy battery drain and heating up. These two problems are interrelated and they can be solve together by doing some manual configurations. The following methods were successfully tested in three hp laptops ( The laptops used processors: AMD A10 with ATI dual graphics, i5 with Intel and ATI dual graphics and Dual Core without graphics card).

1)  The first and most important solution to the problem is TLP. (Thanks to my friend who told me about this.)  TLP is an advanced power management tool for Linux. It is a pure command line tool with automated background tasks and does not contain a GUI. Before installing TLP you should remove any scripts you have already added for power saving (e.g.: in /etc/rc.local) and purge the laptop-mode-tools if installed ("sudo apt-get purge laptop-mode-tools").

TLP can be installed on most laptops by running the following commands: 

                   
 For think pads use the following commands:


TLP applies the following settings depending on the power source (battery / ac): Kernel laptop mode and dirty buffer timeouts; Processor frequency scaling including "turbo boost" / "turbo core"; Power aware process scheduler for multi-core/hyper-threading; Hard disk advanced power management level and spin down timeout (per disk); SATA aggressive link power management (ALPM); PCI Express active state power management (PCIe ASPM) – Linux 2.6.35 and above; Runtime power management for PCI(e) bus devices – Linux 2.6.35 and above; Radeon KMS power management – Linux 2.6.35 and above, not fglrx; Wifi power saving mode – depending on kernel/driver; Power off optical drive in drive bay (on battery).

Once TLP is installed we can go with the default settings. But additional tweaking can be done by modifying the TLP settings. (How to tweak the TLP settings discussed below is adopted from askubuntu.com with some minor modifications). The main config file of TLP is at /etc/default/tlp


2) CPU frequency scaling enables the operating system to scale the CPU frequency up or down in order to save power. CPU frequencies can be scaled automatically depending on the system load, in response to ACPI events, or manually by userspace programs. CPU frequency scaling is implemented in Linux kernel, the infrastructure is called cpufreq. Since kernel 3.4 the necessary modules are loaded automatically and the recommended ondemand governer is enabled by default. But you can take control of your cpu frequency and can run on low frequency when you dont need much computational power. This can be done by installing indicator-cpufreq. This indicator will allow you to take control of cpu frequency.


There are 4 default governers available in the program : Conservative, Ondemand, Powersave and Performance. In addition it will show various frequencies to which the processor can be adjusted manually.


This is done by TLP also but you can have a better control using from the GUI by adding this indicator.

  3) Using VA-API hardware acceleration on Intel/AMD cards can save power as well as it will give you better rendering of HD videos. This will reduce the power consumption and heat generation on processor while playing videos. This can running the following commands for
Intel:
              
or for AMD
                
Mplayer, smplayer or vlc can be used with VA-API. The default mplayer doesnt support it but can be installed by using following commands:
                
The smplayer with VAAPI can be installed using:
                
The settings for smplayer can be changed by going to Option tab > Preferences, on the Video tab > General Video > Output driver set the video output driver to "vaapi" as shown here.

VLC media player can be installed using the following commands and can be configured to use VAAPI in Tools > Preferences > Input & Codecs > Enable Use GPU Accelerated decoding and in Videos Enable Accelarated video Overlay Output
                

  These tweakings can reduce the heating problem to a great extent and improve the battery life very much.

Wednesday, February 6, 2013

INSTALL MICROSOFT OFFICE 2010 IN UBUNTU 14.04/13.10/13.04/12.10 AND MINT AND MAKE IT DEFAULT


Microsoft Office is my favorite office application. The default LibreOffice in Ubuntu 12.10 lacks a lot of Features available in MS Office. After succesfull installation of Microsoft Office 2007 in Ubuntu 11.10 and 12.04/12.10, I tried installing Microsoft Office 2010 in 12.10. The installation instructions for Microsoft Office 2007 in 12.10 is same as that in 12.04. To install Microsoft Office 2010 in Ubuntu 12.10,  I followed the following steps. There are few changes in the dependencies needed for 2010 when compared to 2007. This method works in Ubuntu 13.04, 13.10 and 14.04 as well. This has been tested on both 32 and 64 bits successfully. This method is reported to work in Ubuntu derivatives like Mint by users through comment.

1. For 64-bit users first step is to install mesa OpenGL and the 32-bit libraries. For all except 14.04 :


For Ubuntu 14.04 users the ia32-libs is replaced by lib32z1


For 32 bit users first step is to install mesa OpenGL only and move to step 3 skipping step 2:


2. 64 bit users need to create softlinks for the 32-bit OpenGL libraries. 32-bit users can skip this step


3. Install wine1.5 or above from the Official Wine PPA.


4. 64 bit users only must run the following commands in a terminal. This will set the Windows version as 32 bit. The Microsoft Office is available for 32 bit only. This is important since only Microsoft Office 2010 32-bit works on Wine and you need a 32-bit Wine environment to run 32-bit Windows applications. This time we are creating a new WINEPREFIX instead of changing the wine settings globally as it might cause problem with other applications installed under wine. The WINEPREFIX can be any directory of your choice.


32 bit users can set the WINEPREFIX. WINEARCH is not needed for 32 bit users.


5. In winetricks install the following dll components: vcrun2008, dotnet20, dotnet40, msxml6, riched20, riched30, gdiplus, vb2run (not mandatory), vb3run, vb4run, vb5run, vb6run, ie8. Also install corefonts from fonts in winetricks. Some components needs to be downloaded manually for this purpose. Download these and paste in ./cache/winetricks/ under home. You can download all the dependencies from this link and extract to ./cache/winetricks in home. The .cache directory is hidden and can be unhided by pressing Ctrl+H. After extracting you can run the single command to install all these in terminal.


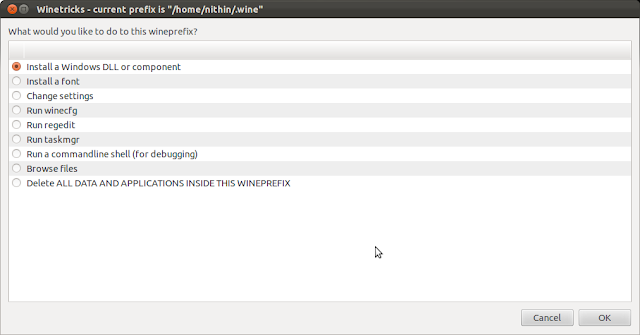
Alternatively select the packages from graphical interface. Run winetricks in terminal and following screen appears. Select Install a Windows DLL or Component and Press Ok.
ms office ubuntu

Tick the following packages: vcrun2008, dotnet20, dotnet40, msxml6, riched20, riched30, gdiplus, vb2run, vb3run, vb4run, vb5run, vb6run, ie8.
[Some components needs to be downloaded manually for this purpose. Download these and paste in ./cache/winetricks/ under home. You can download all the dependencies from this link and extract to ./cache/winetricks in home. The .cache directory is hidden and can be unhided by pressing Ctrl+H.]


6. Now run winecfg in terminal. In the wine settings window that appears go to "Libraries" tab. From the "Existing overrides" section, select the above installed dll components and click Edit and change from"(native, built-in)" to "Native (Windows)" and click OK.

ms office ubuntu

7. The dependencies needed for Microsoft Office 2010 are installed and now we can install Microsoft office. Copy the installer to home and cd to that folder. Now run "wine Setup.exe". Replace setup.exe with filename or path of Installer. Now follow the Installer and complete the setup. The office can be run from Dash by searching Microsoft.


Note: If you close the  terminal in between installation the default wineprefix might change in that case installation can be done by using the following command instead:
WINEPREFIX=/home/user/.wineprefixes/office2010/ wine Setup.exe


ms office ubuntums office ubuntu

ms office ubuntu

ms office ubuntu

ms office ubuntu

ms office ubuntu

ms office ubuntu

ms office ubuntu

ms office ubuntu

ms office ubuntu


8. The microsoft office applications can be made default by adding the following lines to  ~/.local/share/applications/mimeaaps.list.
This must be added under both [Default Applications] as well as [Added Associations] section


Note : 1. By installing cups-pdf (sudo apt-get install cups-pdf), we can have a pdf printer in wine. This way, we can export to PDF not only from MS Office, but also from any other application installed in wine.
                 2. VBA macros need microsoft visual basic runtimes which is available for installation via winetricks as vb2run, vb3run, vb4run, vb5run, vb6run, etc. Install these as in Step 5 if they are required.